While not being a class that is directly accessed by the User, both the Sprite class and the SpriteText class inherit directly from the BaseSprite class, making it an important class on its own. Any of the Properties of the BaseSprite class can be directly used by either Sprites or SpriteText, changing many of the visual aspects of the Object.
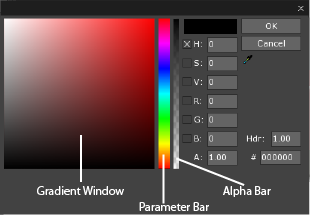
Using the Color Picker
The base color of a Sprite can be changed in several different methods:
- Entering the Hex Code of the desired color into the Color Picker. For example,
FF0000for Red. - Click and Drag the Eye Dropper tool onto the desired color on screen.
- By setting the VertexColor property to a Real4 within a NadaScript.
- Choosing the desired color in the Color Picker either in the gradient window or by directly setting either the RGBA or HSV values.
(NOTE)The Strength of the Eye Dropper: Using the Eye Dropper tool, it's possible to take colors from any image that is on the computer screen. For example, by having an image of a painting open, it becomes possible to take the colors used for the painting and make the same color palette.

(NOTE)Nadascript vs Editor Differences: You'll notice when using the Color Picker tool in Editor the RGB values go between 0 and 255, however when changing the color through a NadaScript the Color Property takes a Real4 with the parameters of (R, G, B, A) that are between 0 and 1. You can get these values by dividing the RGB values by 255; for example, a purple color with an RGB of (255, 0, 185) and Alpha of 1 would have a Real4 of (1.0, 0.0, 0.73, 1).
As you can see, there are several parameters that can be changed using the Color Picker:
- (H)ue: The base color of the Sprite object, ranging between
0and360 - (S)aturation: How deep the base color is, ranging from
0to100 - (V)alue: How bright the color is, ranging from
0to100 - (R)ed: Between
0and255 - (B)lue: Between
0and255 - (G)reen: Between
0and255 - (A)lpha: Transparency, ranging between
0and1 - HDR: High Dynamic Range, which allows for the Sprite to show a higher luminosity value than normal
- #: Hex Code of the current color
Depending on the current parameter chosen the Color Picker will change how it looks, however two things will always remain constant:
- The Parameter Bar will always adjust the currently selected parameter between 0 at the bottom, and that parameters maximum value at the top
- The Alpha Bar will always adjust the Alpha value, from 0 at the bottom to 1 at the top
Using these the color can be changed to any shade needed. Alternately if either the HSV or RGB values are known, they can also simply be typed in.
Alpha Blending
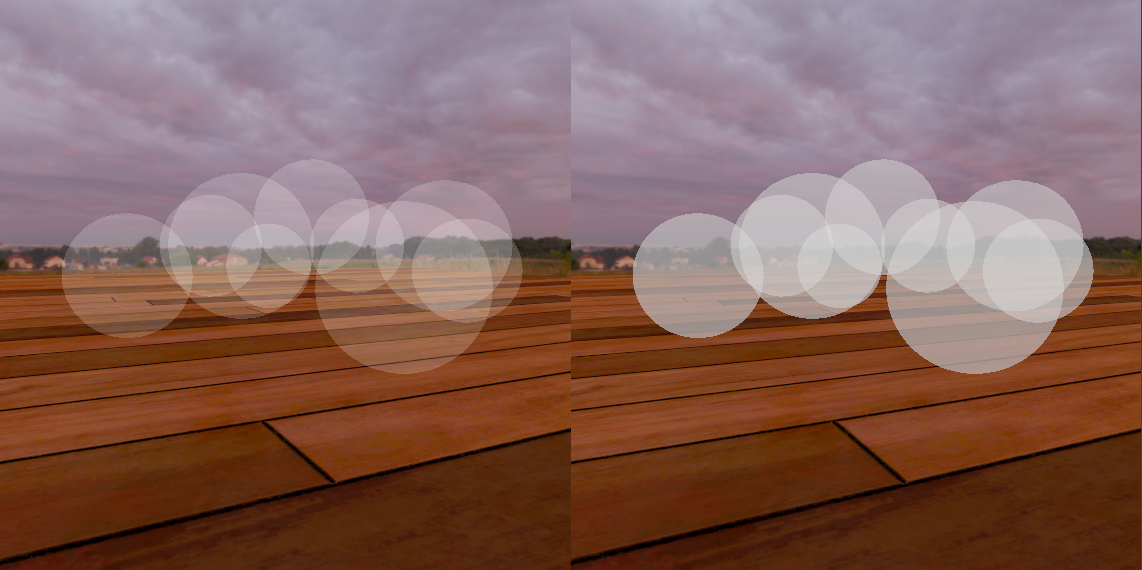
When using alpha blending, a renderpass must be performed with the appropriate blendsettings set. The DeferredRenderer performs an linearly interpolating blend by default using the AlphaBlend resource RenderGroup. Since the AlphaSprite resource Material is already in AlphaBlend resource, setting the alpha value of the VertexColor is sufficient in making transparent sprites. Additive blending is also available through the alternative AdditiveBlend resource RenderGroup.
 Alpha Blending(left) vs. Additive Blending(right)
RenderGroups for Sprites
| RenderGroup | Equation | Effect |
|---|---|---|
| AlphaBlend resource | Color = Lerp(Source, Destination, Alpha) |
Linear Interpolation between sprite and image |
| AdditiveBlend resource | Color = Source*Alpha + Destination |
Adding the sprite to the image |
Related Materials
Manual
- {icon university}[[Sprite
- spritetext
- DeferredRenderer
- RenderGroup
- Material