3D assets, such as models, model animations, and images to be used on a Material, are added as Resources in the form of meshes, animations, and textures. The preferred file format for 3D assets is .fbx for models and animations (though Zilch does accept a number of other formats such as.obj, .3ds, .blend, etc...) and .png for textures. See resourceadding for how to import data files into Zilch.
Models and Model Animations
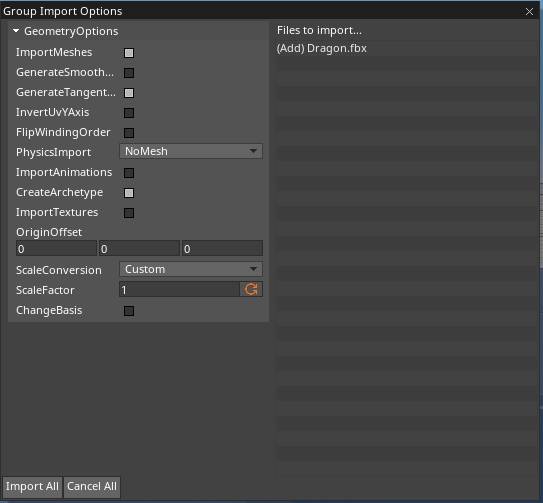
After the file has been imported, a new window will open-GroupImportOptions window-that will provide a number of options for how the data should converted into a Resource.
Group Import Options
This window allows the user to specify a number of properties such as whether to import meshes, animations, and textures, whether to convert the scale of the imported asset, and more. All available options are described below.
NOTE: All options except for ImportMeshes checkBox, ImportAnimations checkBox, and ImportTextures checkBox may be modified in the Properties window window by selecting the Resource from the Library after the asset has been imported.

GenerateSmoothNormals and SmoothingAngleDegreesThreshold
GenerateSmoothNormals checkBox is a boolean property set to false by default. When set to true, it exposes SmoothingDegreesAngleThreshold . Together, they smooth the normals between the vertices of a mesh where the angle between the vertices falls below the value set in SmoothingDegreesAngleTheshold .
On an object shaded with uniform colors, smoothing the normals will have the effect of making the mesh appear seamless. Normally, whether an object should appear seamless or have each polygon be discretely visible is up to the artist working on a project. If using outsourced or pre-made art assets, however, one might wish to smooth the normals on an object with visible seams between each polygon.
InvertUvYaxis
This boolean property should be set to true if the mesh being imported was authored and exported in a program where the default export options do not match Zilch's convention. When imported, the y-coordinate for each vertex will be inverted. Zilch's uv coordinate convention is for (0,0) to be at top-left and (1,1) at bottom right. Note this will only change the mesh being imported, not any textures that being imported along with it.
Asset creation programs may export with a different convention where (0,0) is at bottom-left, causing the y-axis (or v-axis) to be inverted if imported to Zilch. If this happens, any Material applied to the object created from textures made for this mesh will not appear as expected. If working with an artist on a project, it is best to have them set the export options to match Zilch's convention. If using outsourced or pre-made art assets, however, one may need to invert the uv y-axis when importing scene assets.
GenerateTangentSpace
This boolean property is set to true by default and should remain that way unless an artist has specifically authored the tangent space in a specific way that is different from Zilch's conventions. In Zilch, the vertex tangent will always be in the increasing x (or u) direction, while the bi-tangent will always be in the increasing y (or v) direction.
FlipWindingOrder
This boolean property, when set to true, will flip the winding order of the vertices of a mesh. The winding order, described as either clockwise or counter-clockwise, is what determines whether a triangle within in the mesh is front-facing or back-facing (for more information on how winding order affects face culling, check out this page. If they are ordered clockwise when imported, setting FlipWindingOrder checkBox to true will change them to counterclockwise; if ordered counterclockwise when imported, they will be changed to clockwise.
OriginOffset
Setting this property will offset the mesh from it's origin by the value specified. As an example, imagine a model of a dragon is imported and OriginOffset is set to [10, 0, 0]. Now, an instance of the archetype generated when the model was imported is created within the level and it's Translation is set to [0, 0, 0]. Normally, the dragon would appear at [0, 0, 0], but since its origin has been offset, it now appears at [10, 0, 0] even though the object's Translation remains at [0, 0, 0].
ScaleConversion and ScaleFactor
ScaleConversion changes the mesh's scaling convention from one unit of measurement to another. For example, if a modeling program exported using centimeters as the unit of measurement, but the rest of the game has been using meters, choosing CentimetersToMeters would scale the mesh to match the units of measurement used throughout the game. The factor by which each option scales an incoming mesh are listed here:
| ScaleConversion | Factor |
|---|---|
CentimetersToInches |
0.39 |
CentimetersToMeters |
0.01 |
InchesToCentimeters |
2.54 |
InchesToMeters |
0.0264 |
MetersToCentimeters |
100.0 |
MetersToInches |
39.3701 |
Custom allows the user to define the factor by which the mesh is scaled by using the value set in ScaleFactor . If a project is using a custom unit of measurement, all imported meshes could be scaled to this custom unit by using ScaleFactor in conjunction with setting ScaleConversion drop-down menu to Custom.
ChangeBasis
This boolean property, when set to true, exposes three more properties, allowing the user to change the X-, Y-, and Z-bases of the mesh. Any of the three bases may be changed to the positive or negative x-, y-, or z-axis. One example where this setting would be changed is if a project is created where the orientation (i.e. right, forward, and up directions) is different from the mesh being imported.
Textures
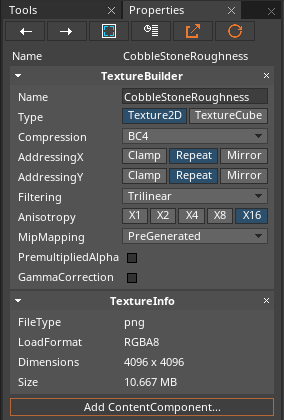
When a file is imported as a texture, there are no options available to it directly after import as there are with models and model animations. There are, however, a number of options available through the texture Resource's ContentComponents, which are listed in the Properties window window and accessed by clicking on the texture Resource in the Library window window.
Default Texture Settings
Based on certain features of the file being imported, the default settings for a texture found in the ContentComponents will be changed. The following table lists the file feature, feature value, setting affected, and the value applied for each possible default setting:
| File Feature | Value | Affected Setting | Setting Value |
|---|---|---|---|
| File Extension | .hdr |
Compression | None |
| Name Substring | "albedo" |
Compression | BC1 |
| Name Substring | "normal" |
Compression | BC5 |
| Name Substring | "metallic"/"metalness" and "roughness" |
Compression | BC5 |
| Name Substring | "metallic"/"metalness" |
Compression | BC4 |
| Name Substring | "roughness" |
Compression | BC4 |
| Name Substring | "albedo" |
GammaCorrection | true |
ContentComponents

Every texture has two ContentComponents: TextureBuilder and TextureInfo.
TextureInfo provides basic information about the texture. These values will stay the same with the exception of Size, which will change if certain properties are modified in the TextureBuilder component, such as Compression or MipMapping.
TextureBuilder, on the other hand, is comprised of a number of modifiable properties that address a few different questions: how should the texture be interpreted, compressed, addressed, sampled & filtered, and corrected.
Interpretation
Type sets whether a texture should be interpreted as a Texture2D or as a TextureCube. TextureCube is the TextureType that should be chosen when the image should be used as a skybox in the renderer. For any possible use, Texture2D should be chosen.
Compression
Compression sets the lossy, hardware-supported format to convert the texture to, if any. For a more detailed explanation, see compression.md.
Addressing
AddressingX and AddressingY set how to address the texture whose uv fall outside of the range [0, 1]. The choices available are described in the table below:
| Enum Value | Description |
|---|---|
| Clamp | Uses the last pixel found at the border of the range |
| Repeat | Wraps to the other side and continues to sample the image |
| Mirror | The texture is mirrored at the range boundaries |
Compression, Anisotropy, and so on. Once imported, check these settings to make sure they have been set correctly.
Sampling and Filtering
Texture sampling is the process by which data is accessed from a texture. Given the near-infinite amount of positions, angles, and distance a texture may be viewed when placed on mesh within a level, as well as the computational limits of a real-time simulation, a number of different algorithms for how this data is accessed have been developed. These algorithms are the different methods of texture filtering.
Filtering describes how pixels from the texture are sampled when viewing the texture from different sizes. Filtering enum sets the algorithm by which to sample the texture. The choices available are:
Nearest- Gets the closest pixelBilinear- Get the four closest pixels and linearly blends between themTrilinear- The same as Bilinear, but with an additional linear blend between mip levels.
anisotropy enum describes how pixels are sampled when the ratio of pixels viewed along its uv directions is not 1 : 1 (typically at an oblique angle). The settings available represent how large of a ratio will be accounted for when sampling the texture. For example, x1 corresponds to a 1 : 1 ratio, which means this is no anisotropy. x16, which is also the highest quality available, corresponds to a 16 : 1 ratio.
Correction
GammaCorrection checkBox, when set to true, will correct the values of each individual texel of a texture to account from moving the texture from linear space to gamma space that is caused by almost all current monitors (HDR monitors are the exception). When a texture authored in linear space is displayed on a monitor, it loses a percentage of its intensity, causing it to appear more washed-out than than was originally intended by the artist who created it. Gamma correction will account for this loss in intensity and correct it back to the intended level. Generally speaking, textures should be gamma corrected unless they have been authored with gamma space in mind. For a more detailed explanation of gamma correction, go here.