This lesson covers the basics of using Variables in Nada.
Learning Objectives
- Learn how to declare variables
- Understand the common variable types
- Learn how to access external variables
Level Setup
- Command : New Project
- Create a new project using the {nav icon=clone, name=Empty 2D Project} template
- Command : CreateSprite
- Command : Add Resource
- Create a NadaScript resource using the Component template template and name it
MyBehavior - In the
Level Window - Select : Sprite object
- In the
Properties Window - Rename Sprite object to
Square - Add Component :
MyBehavior
Class Variables
A variable is a stored value of a given type. In order to manipulate a variable you must know its type and what values it can hold. Below is a table of the most common variable types in Nada.
| Type | Acceptable Values | Common Operators |
|---|---|---|
| boolean | true false |
= |
| integer | 1 -2 100 etc |
= + - * / += -= *= /= ++ -- |
| real | 0.1 -1.2 3.1415926, etc |
= + - * / += -= *= /= ++ -- |
| real2 | Real2(0.1, -2.5) etc |
= + - * / += -= *= /= |
| real3 | Real3(0.1, -2.5, 19.0) etc |
= + - * / += -= *= /= |
| real4 | Real4(0.1, -2.5, 19.0, 0.0) etc |
= + - * / += -= *= /= |
| string | Hello World! etc |
= |
Variables are used to represent values your game needs to perform its logic such as, Lives, Ammo, Run Speed and more. Let's create a new variable for our MyBehavior component class.
We can declare (create) a variable by typing the following code within the class scope:
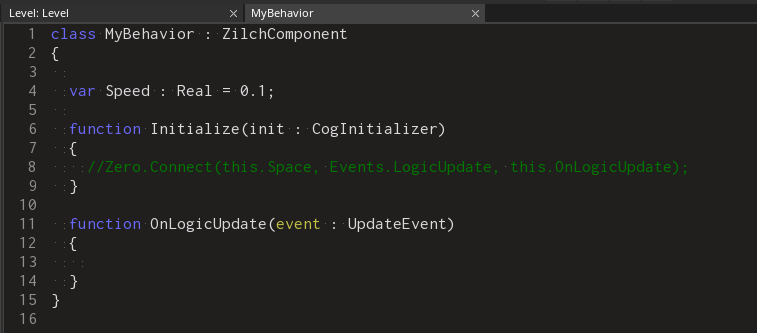
var Speed : Real = 0.1;
var - Indicates that we want to create a new variable
Speed - The name of our variable. A class variable's name must be capitalized.
: Real - Denotes that the variable we are creating is of type Real.
= 0.1 - The assigned starting value for our variable (0.01 in this case).
; - Indicates that we're done with instructions on this line of code.
Here is what your code should look like:
Operators
Operators are special symbols used to manipulate or compare variables. Let's look at the different ways of modifying our Speed variable.
Assignment =
The assignment operator sets the value of the variable on its left (known as the left-hand operand) to the value on its right (the right-hand operand). The left-hand operand must be a variable, while the right-hand operand may be a literal value, another variable of the same type, or an expression that combines both.
Examples:
this.Speed = 5.0;
var Pi : Real = 3.1415926;

this.Speed = this.Pi;
var Pi : Real = 3.1415926;

this.Speed = this.Pi + 5.0;
NOTE: Class variables are accessed by using the this keyword; which refers to the class object we're currently in, that is the MyBehavior component. We then use the dot . operator to indicate that we want a member of the object on the left of it. Thus by typing this.Speed we're indicating "The variable named Speed that is a member of the class we're currently in".
Arithmetic Operators + - * /
Applicable to arithmetic types (Integer, Real, Real2, Real3, etc) these allow you to create expressions the perform the corresponding math operations:
+- Add-- Subtract*- Multiply/- Divide
this.Speed = this.Speed + 1.0;
this.Speed = this.Speed * 2.0;
NOTE: If the value of the arithmetic operation isn't stored in a variable, then the operation has no repercussion and will be ignored.
Arithmetic Assignment Operators += -= *= /=
These operators let you add, subtract, multiply and subtract the values on the right of the operator to the current value of the variable on the left of it. They are only available for arithmetic types.
Example:
var Speed : Real = 1.0;

this.Speed += 2.3;

//The value of this.Speed is now 3.3
NOTE: Using these operators is logically equivalent to preforming the corresponding operation using the variable itself on the right of the assignment operator. For example, this.Speed += 5.0; is the same as this.Speed = this.Speed + 5.0;.
Increment and Decrement Operators ++ --
These are used in combination with Integer and Real types to either add or subtract 1 to the current value of the variable. In Nada, these are always used before the variable you want to increment.
Example:
++this.Speed;
NOTE: Using ++this.Speed; is logically equivalent to this.Speed += 1.0; and only exists for convenience.
Accessing Properties
Up until now we have modified properties on various components through the Properties Window, but internally, those properties are just variables we can manipulate in code at runtime (while the game is running).
Let's try and modify our Square object to move to the right based on our speed. So the value we're looking to modify is the Translation property in the Transform component and we want to do that on Logic Update so that it happens every frame.
- Add the following line of code inside LogicUpdate:
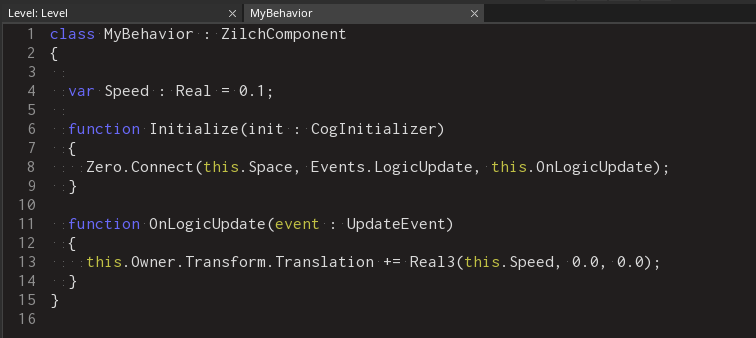
this.Owner.Transform.Translation += Real3(this.Speed, 0, 0);
|this. | Refers to the class we're currently in (In this case the MyBehavior component) |
|Owner. | The object that owns this component. |
|Transform. | The component we're trying to access. |
|Translation | The property (or variable) we want to modify. |
NOTE: this.Owner.Transform.Translation can be interpreted as "The Translation property of the Transform of the object that owns this component"
|+= | Add and assign operator to add a value to the current translation. |
|Real3(X, Y, Z) | Here we create a Real3 since that's the type of the Translation property we're looking to modify. Real3s are composed of three Real values which are referred to X, Y and Z in order. |
|this.Speed, 0, 0 | Here we're accessing the Speed variable created earlier and using it as the X value. We'll just use 0 for Y and Z. |
|; | Indicates that we're done with instructions on this line of code.|
Here's what your code should look like:

Dependencies
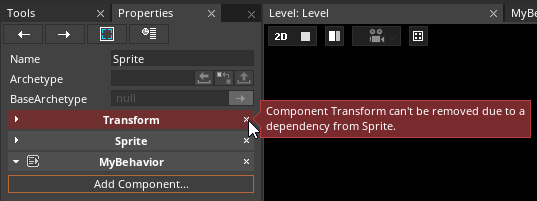
Previously, we demonstrated how to access a property of another component. However, we have made the assumption that our owner object had that component; if it didn't Zilch would give us an error:

To prevent this, we can declare a dependency on the Transform component.
- Add the following line at the beginning of the class scope:
[Dependency]
var Transform : Transform;
By adding this we prevent the addition of the MyBehavior component to objects without a Transform component. The [Dependency] part is an attribute that modifies the following variable; you can find more information about them in the Attribute Manual Page.

NOTE: This also allows us to shorten part our previous line of code this.Owner.Transform.Translation to just this.Transform.Translation since we're already referencing the dependency.
Once the dependency is declared, dependent components can't be removed unless no dependent components are removed first.
- Attempt to remove the Transform component from Square object.
Properties
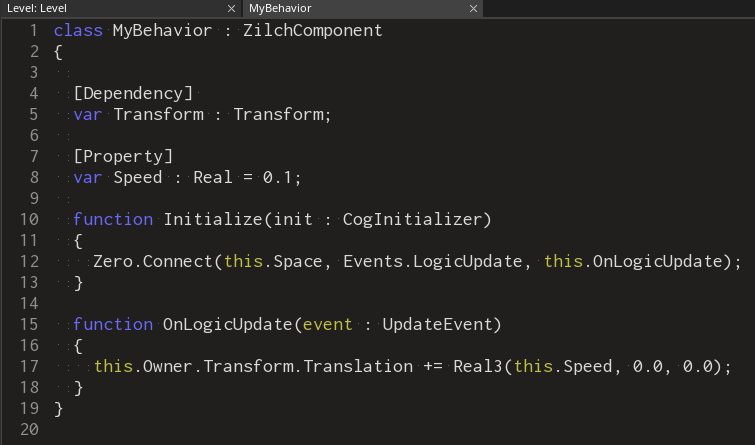
It is also possible to turn your class variables into properties that can be accessed and modified via the Properties Window. To accomplish that we add the [Property] attribute before the variable declaration.
- Add the
[Property]attribute to theSpeedvariable:
Here's what it should look like:
We can then find the Speed property and edit it in the Properties Window.
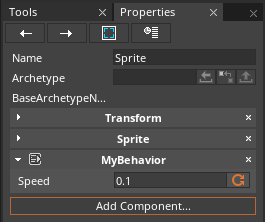
- Select : Sprite object
- In the
Properties Window - Under
MyBehavior - Set Speed to 0.02
- Command : PlayGame
Notice that the object moves a lot slower now, in accordance with the 0.02 value we set on the Properties Window and NOT the initial value of 0.1 given when the function was declared. Once a variable is given a Property attribute; its values are serialized and will match the one listed in the Properties Window.
Local Variables
Local Variables are defined within the scope of a function or nested scope are called local variables; they must begin with lower case letter and will cease to exist at the end of the scope in which they were created in. Local variables are useful when calculating value that do not need to persist outside a scope.
Example:
var lives : Integer = 3;
Putting it all Together
Now that we've seen the basics of using variables, let's move create a variable to determine the direction the Square object object should move.
- In the
MyBehaviorscript - Add the following property:
[Property]
var Direction : Real2 = Real2(1.0, 1.0);
- In the
MyBehaviorscript - Replace the previous content of the LogicUpdate function with the following:
function OnLogicUpdate(event : UpdateEvent)
{
  var normalized_direction : Real2 = Math.Normalize(this.Direction);
  this.Owner.Transform.Translation += Real3(normalized_direction * this.Speed, 0.0);
}
Here we create a local variable that is the normalized value given by the Direction property; that is, a vector that points in the same direction but of length 1.0. We then used that normalized direction to construct a Real3 (out of a Real2 and a Real), multiplying the direction by our Speed property and assign it to the Square object's translation.
